Pregnancy and pelvic floor
Prepartum training has been shown to have a positive effect on the prevention of pelvic floor symptoms following childbirth (Randomized controlled trial of pelvic floor muscle training during pregnancy. Salvesen KA, Morkved S.). Training involves conscious relaxation and tightening of the pelvic floor muscle.
Even after childbirth, gradual recovery and strengthening of the pelvic floor muscle is a necessity to prevent symptoms.
Often recovery comes naturally by listening carefully to your body.
As a result of pregnancy, various complaints can arise. These include:
✓ Urinary leakage due to pressure from uterus on bladder or due to pregnancy hormone
✓ Pelvic instability after pregnancy, twisting in pelvis, gives pain. Pain in tailbone may also occur
✓ Pelvic dysfunction, the pelvis can no longer be fixed by muscle strength
✓ Sagging due to stretching and loss of function of fascial connective tissues
Role of the pelvic floor
During childbirth, the pelvic floor muscles are greatly stretched.
After childbirth, the stretched muscles will grow back to the normal position. This takes some time. A stretched muscle will give a pain experience.
The pain experience will reduce the intensity and frequency of pelvic floor muscle use. This will result in various pelvic-related complaints, such as incontinence, etc.
After the pain is reduced or gone, the pelvic floor muscle can be trained again. Consider endurance strength training and eventually strength training with coordination training.
A pinching, tearing or tearing leads to muscle damage and possibly to permanently adhered (scarred) connective tissues. This reduces the function of the pelvic floor muscle.
Treatment
An indicative treatment schedule is given below. Indicative, because every woman has had a different delivery, with more or less damage to the pelvic floor.
Prior to delivery, the woman is advised to train the pelvic floor muscle so that it can relax and tighten properly.
In case of serious complications during childbirth, a doctor should first approve postpartum pelvic floor training.
For the first 3 weeks after delivery, pelvic floor training will be very minimal. The muscles and tissue are recovering. The load is at low strength and can be performed with increasingly longer activation times. Over the course of the weeks, the woman can slowly begin to regain some strength.
After about 6 weeks, the woman should normally be able (without complications) to tighten and relax the pelvic floor muscle again. Depending on the woman's performance, the strength and duration can be increased.
After about 3 months, after proper build-up and progress, most women will be able to provide sustained strength and coordination.
During pelvic floor training, physical therapy treatment focuses primarily on identifying why the so-called inhibition (suppression) or fasciculation (activation) occur.
The pelvic floor is part of a morphological and functional whole. Similarly, dysfunctions of the back-pelvic hip complex can lead to hypertonia and/or inhibition of surrounding muscles, including the pelvic floor.
Using the 4xT Method, it is easy to test which jammers lead to fasciculation and/or inhibition of the pelvic floor. Pelvic floor physical therapy according to the new 4xT protocol, is based on an arthro myofascial approach. Pelvic rehabilitation includes pelvic floor training and cross walk as training.
Pelvictrainer®
The Pelvictrainer® registers externally the degree of activity in your pelvic floor muscle and shows this in the form of a signal on a screen (bio feedback). You sit on the chair with your clothes on.
Using the Pelvictrainer®
Training schedule
Steps in pelvic floor muscle training prepartum:
Step 1: Awareness of the pelvic floor muscle.
Step 2: Relaxation
Step 3: Duration and strength training
Steps in pelvic floor muscle training postpartum:
Step 4: (Awareness of the pelvic floor muscle).
Step 5: First three weeks: from minimal to gradual relaxation, tightening and duration
Step 6: From six weeks: build up strength and duration
Step 7: From twelve weeks: build strength and coordination
In addition to pelvic floor training with the Pelvictrainer®, you can also do ADL home exercises.
Explanation of the steps in pelvic floor muscle training:
Step 1 and Step 4: Pelvic floor muscle awareness.
With the Pelvictrainer® you can choose Open training in which you can tighten or relax your pelvic floor muscle, possibly with instruction from your physical therapist. The aim is to give you the feeling that you are training the right muscle and also to what extent you can tighten and relax it.

Example of Open Training
Use an extra cushion on the Pelvictrainer if sitting is (still) too painful.
Step 2: Relaxation
With basic strength training, the pelvic floor muscle is tensed at a relatively low force (as a rule, 40% of the maximum force measured). Should you have difficulty relaxing, you should increase the time duration for relaxation.

Pelvic floor relaxation training for low back pain
Step 3: Increase duration and strength
If you are able to tighten your pelvic floor for a long time in step 2 and can relax sufficiently well afterwards, the treatment will move on to more intensive strength training. In the Basic training the intensity is increased in steps from 50% to 70%.
Step 4: See step 1
If you still experience a lot of pain, use extra soft pillows.
Step 5: Find balance in relaxation, tightening and duration
During the first week, train your pelvic floor muscle with minimal effort.
With basic strength training, the pelvic floor muscle is contracted at a relatively low effort (as a rule, 30% of the maximum measured achievable effort). The duration of tightening (isometric) is initially low (10) and can then be increased. If you find it difficult to relax, increase the duration for relaxation.
To regain balance, the duration of tightening is taken as much as possible.
6. Increase strength and duration
If in step 5 you are able to tighten your pelvic floor for a prolonged period of time and then relax sufficiently well, the treatment proceeds to more intensive strength training.
7. Increase strength and coordination
Once you are at maximum strength effort in step 6, you can also train for speed. In advanced training, the speed at which you should tighten the muscle is displayed with the Tangent. Start at a low value and increase it to the 80% range. Especially this training is important for recovering from and preventing, for example, stress incontinence.
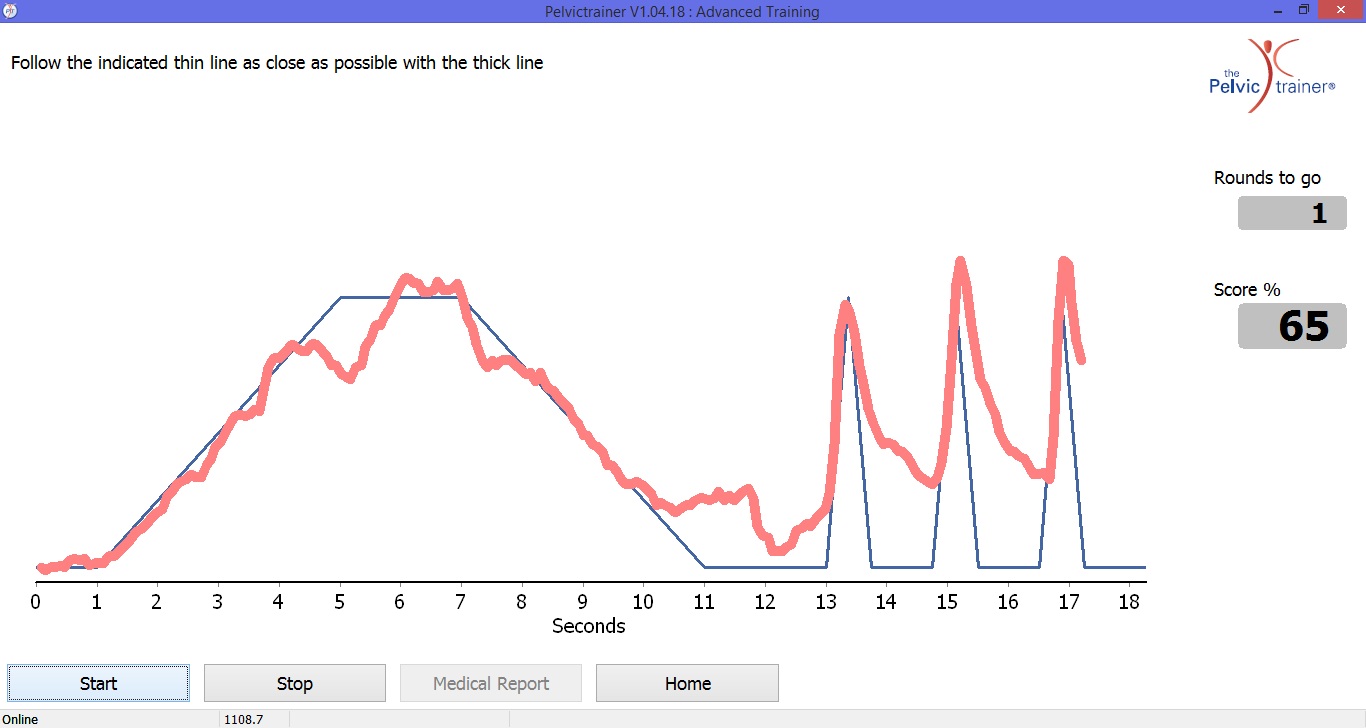
Example of coordination training in combination with strength training
Disclaimer:
The information on this website is not intended to diagnose health problems or prescribe treatment or products, download the Disclaimer file for further provisions.
What can I do?
If you are interested in non-internal pelvic exercise with biofeedback, ask your fitness practitioner or (pelvic) physical therapist for use of the Pelvictrainer®.

Standout through innovation: that is the mission of Msys Medical Systems®. Because we believe in great products and solutions that contribute to healthcare.
The products of Msys are the tools for you for effective movement therapy for patients: based on measurement, testing, training, treatment, recording and evaluation.
Contact the Netherlands
Van Breugelplantsoen 42
3771 VR Barneveld
Nederland
Tel: +31 34 240 8760
Mail: info@msys.eu
Contact Switzerland
Msys Technology GmbH
Klausstrasse 44
CH-8008 Zürich
Zwitserland
Tel.: +41 44 383 19 54
© Msys B.V. ® - All rights reserved - Tel: +31 342 408760 (Netherlands) - Mail: info@msys.eu